


The Frustrating Reality of Renovated House Networking
You did everything right. You found the perfect renovated house, closed the deal, moved in your gear, and excitedly plugged into what you thought was a modern, wired network. Then… nothing. No internet. No connection. Just blinking lights and frustration. If this sounds painfully familiar, you're not alone. In fact, you've just joined a massive club of homeowners who discover that their "fully wired" house has networking issues that would make an IT professional cringe.
That Reddit post with 646 upvotes and 185 comments? That's your story. The one where someone found only a single properly terminated keystone jack, with all the others just having loose Cat6 cable shoved behind outdated Cat5e faceplates. It's the home networking equivalent of finding beautiful hardwood floors… covered in three layers of linoleum. The infrastructure is there, but someone took shortcuts that render it useless.
Here's the thing most contractors won't tell you: low-voltage wiring—that's your Ethernet, coaxial, and phone lines—is often the first place they cut corners. It's invisible once the walls are closed up, and many homeowners don't test it until move-in day. By then, the contractor is long gone, and you're left holding a bunch of expensive, non-functional Ethernet ports.
But don't panic. In this guide, I'll walk you through exactly what to check, how to fix the most common issues, and how to make sure your home network actually performs like it's 2026, not 2006. I've helped dozens of friends and clients through this exact scenario, and I can tell you from experience: most of these problems are fixable with some basic tools and knowledge.
Understanding What You're Actually Looking At
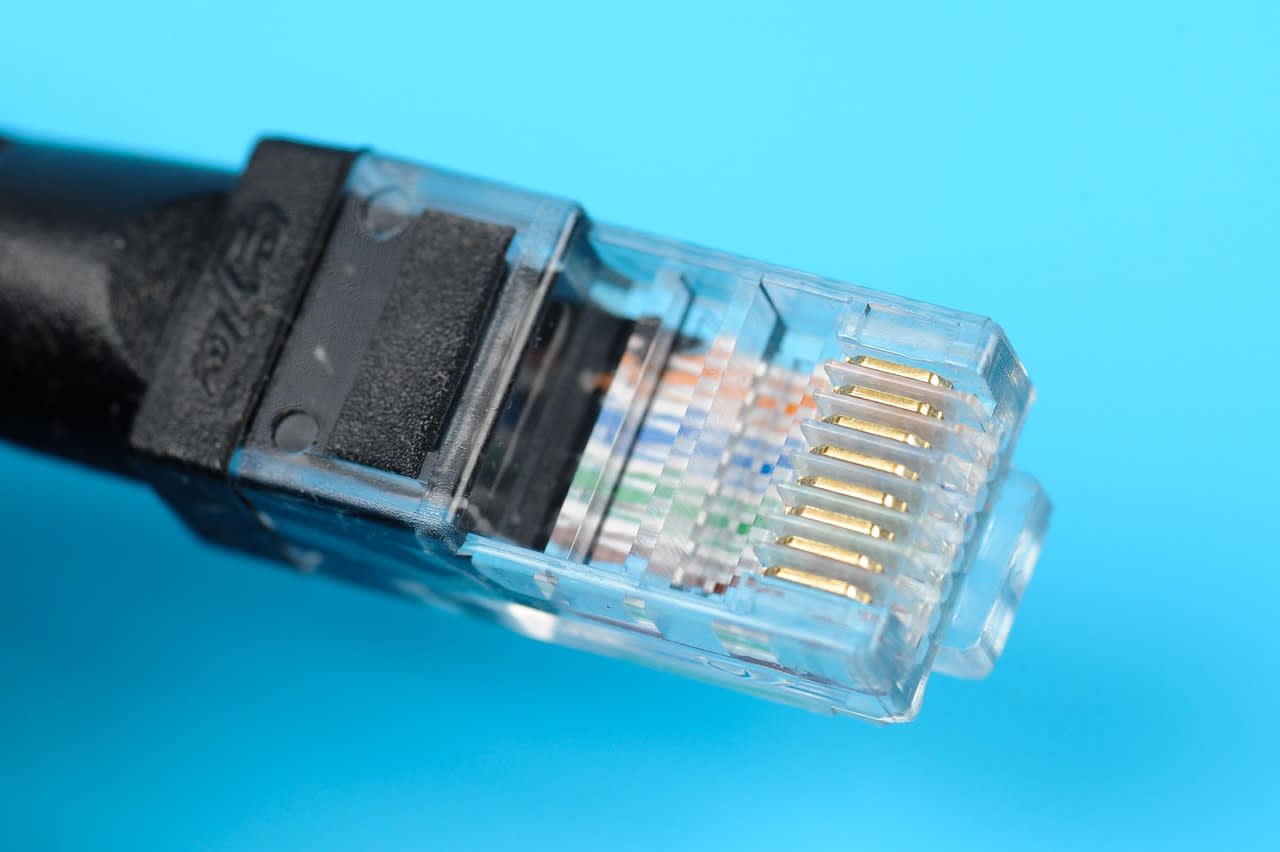
Before you start ripping faceplates off the wall, let's get our terminology straight. That Reddit user mentioned a few key things: "keystone," "terminated," "Cat6," and "Cat5e." These aren't just tech jargon—they're the building blocks of your home network.
A keystone jack is that little modular connector that snaps into your wall plate. It's where you actually plug your Ethernet cable in. Think of it as the electrical outlet for your data. "Terminated" means the individual wires inside your Ethernet cable have been properly connected (punched down) into the correct slots on the back of that keystone jack. If it's not terminated, you've basically got a dead end.
Now, the cable types matter more than you might think. Cat5e has been the standard for years—it supports up to 1 Gigabit speeds at 100 meters. Cat6 is better: it can handle 10 Gigabit speeds at shorter distances (up to 55 meters), has better shielding against interference, and is generally more future-proof. Finding Cat6 cable behind a Cat5e keystone is like having fiber optic cable running to your house but connecting it with tin cans and string.
Here's why this mismatch happens: contractors often buy cable in bulk. Cat6 might have been on sale, or maybe they upgraded partway through the job. But then they use whatever keystone jacks they have lying around—often older Cat5e stock. Or worse, they don't terminate anything at all, just leaving raw cable coiled up in the wall box, assuming "someone else will deal with it." That someone is now you.
Step 1: The Essential Diagnostic Toolkit
You can't fix what you can't diagnose. Before you do anything else, you need the right tools. The good news? You don't need thousands of dollars worth of professional equipment. For most homeowners, about $100-150 in tools will get you 90% of the way there.
First, you absolutely need a basic cable tester. Not the fancy $500 ones the pros use, but a simple continuity tester that can tell you if all eight wires in your Ethernet cable are connected properly from one end to the other. I personally keep a Klein Tools VDV526-052 in my bag—it's affordable, reliable, and tells you exactly what's wrong with a cable. It'll identify open wires, shorts, and miswires in seconds.
Next, you'll need a punch-down tool. This is what actually terminates the wires into the keystone jack. There are two main types: impact tools (which click when you press down) and non-impact tools. For occasional use, a simple non-impact tool is fine. If you're doing more than a few jacks, consider springing for an impact tool—it's easier on your hands and gives more consistent results.
Don't forget a good pair of cable strippers and snips. Trying to strip Ethernet cable with regular scissors or a knife is a recipe for nicking the delicate internal wires. And a tone generator and probe (often called a "fox and hound") can be invaluable if you need to figure out which cable in a bundle goes to which room.
Finally, have some spare keystone jacks on hand. Get the right type for your cable—if you have Cat6 cable, use Cat6 keystones. They're not expensive, and having extras means you can replace improperly installed ones without making another trip to the store.
Step 2: The Systematic Wall Plate Investigation
Now comes the detective work. Start with one room and work methodically. Turn off the power to that circuit first—safety always comes first, even though Ethernet is low voltage. Remove the faceplate from the wall. You'll typically find one of several scenarios, ranging from "perfectly fine" to "what were they thinking?"
The Best Case: A properly terminated keystone jack, with the cable neatly dressed and labeled. The wires follow either the T568A or T568B standard (more on that in a minute), and there's no excess untwisted cable. Give this one a gold star.
The Common Problem: What our Reddit friend found. A keystone jack is present, but if you look at the back, the wires aren't punched down. They're just loose behind the plate. Or worse, they're punched down incorrectly—maybe only four wires instead of eight, or in the wrong order.
The Mismatch Special: Cat6 cable connected to a Cat5e keystone. This isn't necessarily a disaster—Cat5e keystones can technically work with Cat6 cable—but you're not getting the full performance your cable can deliver. It's like putting regular gasoline in a premium-only car.
The "Why Bother?": No keystone at all. Just a raw Ethernet cable coiled up in the electrical box, maybe with the ends taped to prevent fraying. This is pure laziness, but it's actually easier to fix than a badly terminated jack because you're starting from scratch.
As you check each jack, take pictures. Label everything. Use painter's tape and a Sharpie to mark which cable goes to which room. This documentation will save you hours of frustration later.
Step 3: The Central Panel Mystery
While you're checking wall plates, don't forget the other end of those cables. In most homes, all the Ethernet cables converge at a central location—often a media panel in a closet, basement, or utility room. This is where your modem and router should connect to distribute internet throughout the house.
What you find here can be even more bewildering than the wall plates. I've seen everything from neatly labeled patch panels to a rat's nest of unterminated cables stuffed into a wall cavity. Here's what to look for:
First, identify how the cables are terminated. Do they go into a patch panel (a mounted panel with multiple Ethernet ports)? Are they terminated with RJ45 connectors (the plastic ends that look like oversized phone plugs)? Or are they just raw cable ends?
A patch panel is the professional approach—it protects the permanent wiring and makes management easier. RJ45 connectors on raw cable can work, but they're more prone to damage. Raw cable ends… well, that's another sign of an unfinished job.
Next, check for labeling. Are the cables marked with which room they go to? If not, you'll need to identify them. This is where that tone generator comes in handy. Connect the tone generator to a cable at the wall plate, then use the probe at the central panel to find the matching cable by sound.
Also, check what equipment is present. Is there a switch? If so, how many ports does it have, and is it Gigabit or better? In 2026, anything less than Gigabit is outdated. Is there power available? Proper ventilation? This central location is the heart of your network—treat it accordingly.
Step 4: Termination Standards: T568A vs. T568B
This is where many DIYers and even some contractors get tripped up. Ethernet cables have eight tiny wires inside, each with a specific color. How those wires are arranged in the keystone jack matters—a lot. There are two accepted standards: T568A and T568B.
The difference is in the order of the green and orange wire pairs. T568B has become more common in residential installations in the US, while T568A is often used in government and some commercial settings. Here's the crucial part: it doesn't matter which standard you use, as long as you use the same one on both ends of the cable.
If you terminate one end as T568A and the other as T568B, you've created what's called a "crossover" cable. These were useful back in the day for connecting two computers directly, but for modern home networking with switches and routers, they won't work properly.
So how do you know which standard was used in your house? Look at the keystone jacks that are already terminated. The colors should be printed right on the jack itself. Follow that pattern for all your terminations. If you're starting from scratch, I recommend T568B—it's more common, and if you ever need to bring in help, most technicians will expect it.
When punching down the wires, pay attention to how much of the cable jacket you remove. You want to strip just enough to reach the termination points—usually about an inch. Don't untwist the pairs more than necessary (no more than 0.5 inches). Those twists are there to prevent interference, and keeping them intact matters for performance, especially with Cat6.
Step 5: Fixing Common Issues (With Specific Examples)

Let's get practical. Based on what you find, here's how to fix the most common problems:
Problem: Unterminated keystone jacks. This is the easiest fix. Remove the old keystone (if present) by releasing the retention clip. Strip about 1.5 inches of the cable jacket, being careful not to nick the internal wires. Arrange the wires according to the standard used in your house (check another jack or the central panel). Use your punch-down tool to seat each wire firmly in its slot. You should hear a clean "click" if using an impact tool. Snap the keystone into the wall plate, and you're done.
Problem: Cat6 cable with Cat5e keystone. You have two options here. Option one: replace the Cat5e keystone with a proper Cat6 keystone. This is the right way to do it. Option two: leave it as is if it's working and you don't need 10 Gigabit speeds. Honestly? In 2026, I'd replace it. Cat6 keystones are cheap, and you're future-proofing your installation.
Problem: No central patch panel. If all your cables converge as raw ends, consider installing a patch panel. It's not as hard as it looks. You'll need a blank patch panel that fits your enclosure, more keystone jacks (or a pre-terminated patch panel), and some patience. Terminate each cable to a keystone, snap them into the patch panel, then use short patch cables to connect to your switch. This protects your permanent wiring and looks professional.
Problem: Cables aren't labeled. This is tedious but necessary. Use your tone generator and probe to identify each cable. Once identified, use a label maker or even masking tape and a Sharpie to mark both ends. Include the room and possibly the jack number if there are multiple in one room.
Step 6: Testing and Validation
Don't just assume your work is good because it looks right. Test every connection thoroughly. Start with your basic cable tester—it'll tell you if all eight wires are connected properly and in the right order. This catches most termination errors.
But for true performance validation, consider a more advanced tester that can measure actual speed capabilities. These can identify issues like excessive crosstalk or attenuation that might limit your speeds even if the basic connectivity is there. For most homeowners, once you've verified proper termination with a basic tester and you're getting your expected internet speeds at the device, you're probably good.
Here's a pro tip: test with an actual device, not just a tester. Connect a laptop directly to the jack (with a known-good cable) and run a speed test. Then compare that to connecting the same laptop directly to your router. If there's a significant drop, you might have a problem with that run.
Also, consider testing for PoE (Power over Ethernet) if you plan to use devices like security cameras, access points, or phones that get power through the Ethernet cable. Some cheaper cables or poor terminations can't handle the current.
When to Call a Professional
Let's be honest: not everyone wants to or should do this work themselves. If you're uncomfortable working with small wires, if the job is particularly complex (multiple floors, dozens of drops), or if you've tried to fix it and it's still not working, it might be time to bring in help.
A good low-voltage technician can typically diagnose and fix these issues in a few hours. They'll have professional-grade test equipment that can pinpoint problems you might miss. Expect to pay $75-$150 per hour, with a minimum service charge. The total will depend on how many jacks need attention and how accessible everything is.
If you do hire someone, consider using a platform like Fiverr to find local network technicians. You can see reviews, compare prices, and often find someone who specializes in residential work rather than massive commercial installations. Just make sure they're actually knowledgeable—ask if they own a proper cable certifier, not just a basic tester.
Another option: if you're dealing with data from multiple sources or need to automate network monitoring, services like Apify offer tools that can help manage and monitor network performance data, though that's more for ongoing management than initial installation.
Preventing This in Your Next Renovation
If you're planning renovations or building new, you can avoid this headache entirely with some careful planning. First, specify exactly what you want in your contract. Don't just say "Ethernet in every room." Specify "Cat6 cable, terminated to Cat6 keystone jacks at both ends, following T568B standard, with all cables home-run to a central patch panel in [location]."
Second, make payment contingent on testing. Before you sign off on the electrical work, test every Ethernet jack yourself or hire someone to do it. Provide the contractor with a simple pass/fail report for each jack. Most reputable contractors will fix any failures without argument.
Third, consider future needs. Run conduit (smurf tube) to key locations so you can easily pull new cables later. Install more drops than you think you need—at least two per room, four in home offices or media rooms. And leave service loops (extra cable) at both ends so terminations can be redone if needed.
Finally, document everything. Take pictures before the drywall goes up. Keep a labeled diagram of where every cable runs. This documentation will be invaluable if you need to make changes later or if you sell the house.
Wrapping Up: From Frustration to Function
Discovering that your "wired" house isn't actually wired properly is incredibly frustrating. You paid for a feature you're not getting to use. But as we've seen, most of these issues are fixable with some patience, the right tools, and methodical troubleshooting.
Start with the basics: check every jack, identify what's actually there, and test what works. Address the easiest fixes first—often, just properly terminating a few keystone jacks gets most of your network up and running. Document everything as you go. And don't be afraid to call in professional help if you hit a wall.
The end result is worth it: a reliable, high-speed wired network throughout your home that can handle everything from 4K streaming to video conferencing to smart home devices without breaking a sweat. In 2026, with internet demands only increasing, that wired backbone is more valuable than ever.
So grab your tools, pick a room, and start investigating. That perfect home network is hiding behind your walls—you just need to properly connect it.
